Categories
UAV

Flies with eyes

After being waylaid a bit by stomach bugs, I got a lot more hardware stuff working over the last two days. I got my ultrasonic range finder board wired up to the main microcontroller. It figures out distance using the method which bats use – emit a chirp, and then listen for the echo. In terms of coding, this means I’ve got external interrupts and 16-bit timer stuff working pretty well. I’ve been putting all of the code into a class “MyLibrary” … a bundle of code I hope to reuse in the future. Anyway, on with the pretty photos …

Range sensors

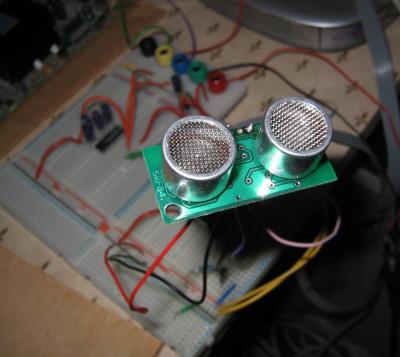
This is the ultrasonic range-finder board, with the emitter/listener pair.


Range circuit
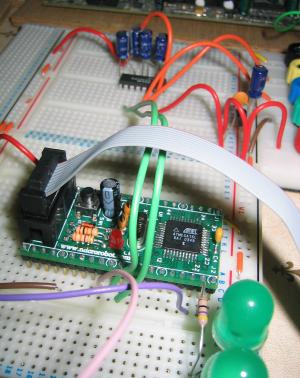
This is my main microcontroller circuit. The Atmega16L is the big chip in the foreground, with 8Mhz timer crystal, reset circuitry and in-circuit programming connector. A couple of super-bright green LED’s are there to increase the blinkenlight coefficient. In the background, a MAX232 uses a capacitor charge-pump to convert the voltage levels so that the Atmega chip can talk to the serial port on my PC. And at the back-right, there’s a simple 5v power supply with filtering caps.


IR sensors
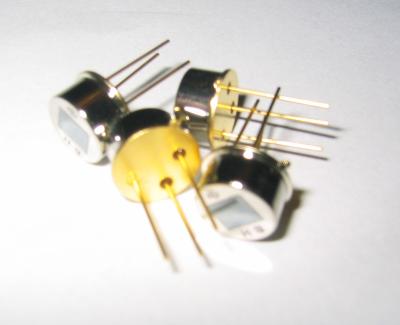
There are coming up next. They’re infrared thermopiles, which detect IR radiation and are a simple and effective way of detecting where the horizon is. More importantly, they’re very shiny. 🙂

Categories
UAV

UAV talks serial

I’ve managed to get the Atmega16 chip talking to my PC over an RS232 serial link. The Atmega has a built in UART, which makes serial comms easy. You just write the data you want to send into a register and the chip does the rest. A MAX232 chip converts from the 5v levels used by the atmega into +10/-10v used in RS232. I can leave my circuit plugged into the serial line and the in-circuit-programming cable and control everything from my PC. I had to work through a few problems with a logic probe to figure out what was going wrong, which made me think that an oscilloscope would be a Fine Idea. So, a quick trip to ebay resulted in a purchase of a basic but very useful oscilloscope, yay!

I’m trying to get Avrforth running at the moment. It runs okay, but whenever I try to store anything to memory, it hangs. I’m going to dig a bit more into this, but it’s not really directly relevant to the UAV project so I’m not going to spend ages on it.

Next task is to get to grips with timers and PWM input. This will let me use my ultrasonic range finder board, which indicates distance by varying the pulse-width. As ever, there is plenty of information out there about this. I also found an old i2c temperature sensor IC which I might try using too.

Categories
UAV

Different flavours of microcontrollers

Tim‘s friend Tony Cole wrote this list of various microcontrollers and what they’re suitable for. It’s really interesting .. much more useful than a dry list of technical specs. So, many thanks to Tony for his expertise and wisdom:

For very small tasks look at the MicroChip PIC, I think there is a GNU C
compiler for it now, but I use Hi-Tech C Compiler.
A very fast PIC copy is the Scenix.
Others: Zilog Z8 - I think this has free C Compiler and network stack.


For small tasks look at the Atmel AVR 8-bit micro controllers:
http://www.atmel.com/dyn/products/devices.asp?family_id=607


The one I use is the ATmega128 128-Kbyte self-programming Flash Program
Memory, 4-Kbyte SRAM, 4-Kbyte EEPROM, 8 Channel 10-bit A/D-converter.
JTAG interface for on-chip-debug. Up to 16 MIPS throughput at 16 MHz.
2.7 - 5.5 Volt operation. 

You can get a in-circuit programmers from Kanda
http://www.kanda.com/index.php3?cs=1&
or the chip manufacturer/distributors.

For RTOSes C Compilers and other tools for the AVR look at
www.avrfreaks.net


###########

For bigger/faster tasks the Atmel AT91 SAM 32-bit ARM processors are
very good, I've used the AT91SAM7S64 Atmel's AT91SAM7S64 is a member of
a series of low pincount Flash microcontrollers based on the 32-bit ARM
RISC processor. It features a 64 Kbyte high-speed Flash and an 16 Kbyte
SRAM, a large set of peripherals, including a USB 2.0 device, and a
complete set of system functions minimizing the number of external
components. The device is an ideal migration path for 8-bit
microcontroller users looking for additional performance and extended
memory.  

The AT91SAM7S256 has 256 Kbyte high-speed Flash and a 64 Kbyte SRAM:

http://www.atmel.com/dyn/products/devices.asp?family_id=605


Look at:
The AT91SAM7S64-IAR bundles the AT91SAM7S-EK evaluation board, a USB
JTAG ICE and a 32 KB limited IAR KickStart toolchain. It enables the
evaluation of and code development for applications running on an
AT91SAM7Sxx device. 

This only cost about £100 and is a good starting point.


ECOS RTOS might be worth looking at: http://ecos.sourceware.org/ there
is also a book on this ROTS.

Or search the web for a free RTOS: e.g. http://www.freertos.org/


###########

Unfortunately, all the above will not realistically run interpreted
languages, such as python, java, scheme, lisp - but you could search the
web, someone might have done it!. These sorts of languages require an OS
like Linux.


If you want to run Linux look at the many embedded PCs available, or the
Atmel AT91RM9200 microcontroller (ARM9 CPU with MMU). The AT91RM9200-EK
Evaluation Kit supports the AT91RM9200 ARM9-based 32-bit RISC
microcontroller and enables real-time code development and evaluation.
http://www.atmel.com/products/AT91/

It has 32MBytes of SDRAM and runs at 200MHz:
The AT91RM9200-EK Evaluation Board
The board consists of an AT91RM9200 together with the following:
! 8 Mbytes of parallel Flash memory
! Four banks of 2M x 32-bit SDRAM
! DataFlash® or SD/MMC memory expansion socket
! Additional DataFlash memory expansion socket
! Digital-to-Analog Converter (DAC) for a stereo audio signal
! Four communication ports (USB host and device, Ethernet, serial and
DBGU)
! Graphic controller with output to a standard VGA monitor
! JTAG/ICE, ETM and code test port interface
! Expansion connector
! Onboard prototype area

I have a working Linux tree and GNU C Compilers for the AT91RM9200-EK,
you can do a lot on this baby. It is well supported see
http://www.arm.linux.org.uk/
Categories
UAV

Hello UAV world

My UAV project has taken its first steps. I got the Atmega16 microcontroller last week, and set about doing the hardware equivalent of “hello, world”, which involves flashing an LED off and on. I breadboarded a circuit with 5v and an LED on the first output line. I had expected that the chips memory was blank and would require some initial programming, and so was pleasantly surprised when I powered it up and saw the LED blinking all by itself. The chip must come with a rather useful default program! A good start.

Mental note: Must buy a bench power supply. I’m fed up building LM7805-based battery-driven power supplies every time I do anything electronic.

Further note: LM7805’s don’t immediately blow up if you plug them into back-to-front.

Final note: Neither do electrolytic capacitors, as far as I can make them, despite dire warnings about their explosive tendencies. They mostly die quietly.

The Atmega16 chip is supported by gcc, and Gentoo linux makes it easy to get this all set up. You just “emerge crossdev” then run “crossdev -target avr”. This produces avr-gcc (and libs/headers in /usr/avr). Finally, you run avr-gcc -mmcu=atmega16 and it generates appropriate code for the chip. The avr-objcopy converts from ELF format to HEX format used by most programmers.

Next, I need to get programmer software working so I could download my program onto the chip. I tried PonyProg first. It could read the chip memory fine, but failed to write. I spent hours trying different delay values, checking and rechecking the connections to no avail. Next, I tried avrdude which is much better (more configurable and better error messages) but still had no success. I kept getting “Verify error – unable to read hfuse properly” errors, which suggested that the cable from the PC to the Atmega board was flaky and unreliable. After many more frustrating hours, I tried using a avrdude on a different PC and it worked first time. Perhaps I cooked the parallel port on my desktop last time I did hardware …

Next step is to get my PC and the Atmega chip talking over a serial link, which just requires a MAX232 chip to convert the voltage levels – the Atmega16 has a builtin USART. Then I can see about getting a forth interpreter running on the chip to allow me to do interactive experiments. I’m not into the whole “compiler, burn, test” cycle … ocaml/ruby/lisp has spoiled me too much.