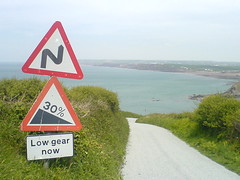
This should be the logo for the Cornwall tourist office. Climbs and descents today, starting to get ‘challenging’.
Tintagel

Stopped for tea at Tintagel. Walked down a steep path with the bike to take a look at the castle, but then regretted it when I had to push the laden bike back up said hill.
Must … not …
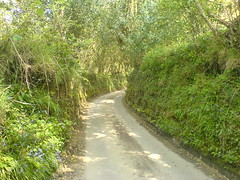
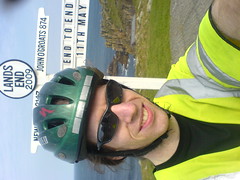
A typical country lane from the ctc bnb route. Very little traffic, plenty of hills. ?But in other news, the lovely people who run tonights bnb welcomed me with cups of tea, then later once i’d fixed their computer we got onto the whisky. Ahem, that’s not in any standard training plan! ?Today in summary: lose: gale force headwind, forcing me down to below walking pace through Penzance. Win: aero bars for minimizing drag. Lose: taking a wrong turning almost straight away and adding a monster climb out of Mousehole unnecesarily. Win: getting 15ukp sponsorship from some random german tourists at lands end. Lose: hearing a clunk going downhill fast, but not realising that i’d lost the top of one of my waterbottles until miles later. Double lose: also missing a turnoff at the same place. Win: rear view mirror. I love it. Lose: the last 10 miles into Wadebridge. Main road at busy time, still windy, pretty hilly. Win: navigating by gps, brilliant. Win: changing the gearing on my bike, couldn’t have done some of those hills on the stock gears. ?Anyhow, i have to do some washing and eating before bed.
Geek

Sandman fans, eat your heart out. 🙂
Wind wind wind
Well, i’m cycling. Against a 35mph most of the way. At truro anyway just now. Aero bars are my new best friend. I’ve spent most of the day hugging them!
Loading up
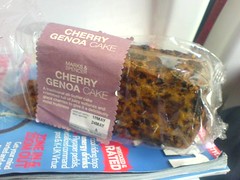
Training for lejog might be hard work, but having a reason to eat an entire cherry cake – 1500 calories – does somewhat make up for it. Being bored on a train with a bag of food is dangerous.
Long way down
I’m on the train, 1.5 hours into the 12 journey to Penzance. I was glad to see the train already sitting waiting, which avoided any time pressure when getting the bike onto the train. The weather is all blue skies and sun as I this morning, but the forecast is predicting strong winds from the east this week. East? That’s not in the plan. Still, one thing I’ve learned from Frank recently is that the forecast is always wrong! So hopefully it will be sunny and still all week long.
Had i bit of a last minute panic last night booking a B&B for Monday night. Had to phone four before I got a place.
Gear list
Since I’m up early today and have a couple of hours before I get on the train, here’s my final gear list. It’s about 10kg total, and fits nicely into my two panniers.
The bike: Courier Nexus, 44t/22t gearing, SJS mudguards, aero bars, 2 bottle cages, rear pannier rack, 2 ‘front’ Ortleib panniers. Front + rear lights + mountings
Bike bits: Small chain lock, GPS and bar mount.
Entertainment: Kindle ebook + charger, iPod + headphones + charger, mobile phone + charger
Food
Misc: 2 x AA batteries (for gps), 2 x AAA batteries (for rear light), some random nuts and bolts, string for clothes line,
Rain gear: Waterproof trousers + jacket + shoe covers, rain gloves, waterproof sealskinz socks
Sun gear: suncream, lip balm, sunglasses
Clothes: 1x cycling shorts, 2xtop, 2xsocks, summer gloves, cycling shoes, helmet, hiviz reflective vest
Evening: light trousers, light fleece, pants, socks, tshirt
Extra: warm leggings, thermal base layer, beanie.
Tools: 6 * cable ties, 2 * spare inners,
– 3x tyre levers,
– puncture kit, pump
– 6 * spare spokes
– spoke key
– tyre boot
– duct tape
– allen key multitool
– 15mm spanner (rear wheel)
– jewellers screwdribver
– 8mm spanner
– cone wrench
– spare chain link
– chain oil
– spare brake cable
– 20t sprocket
– nitrile gloves
– cloth
Navigation:
Road map (pages)
Compass
Written direction
B&B phone numbers, map/location
Toiletries
– Inhalers
– Travel towel
– Shower gel/shampoo/conditioner
– Toothpaste/brush
– Razor/shaving gel
– sudocream
– first aid kit
– spork
– Hairbrush
– Earplugs
– Ibuprofen
Testing
If I say lat 56.001 lon -3.405, does it work?
GPS download
Tonight, I’ve been transferring the planned route onto my GPS. It’s a fairly old device with limited memory, so I’ve had to make some compromises. It can only store 20 “routes” consisting of 50 points. Having studied the maps, I decided that navigation in Scotland was pretty darn straightforward, whereas navigation through England was much harder (no bias here!). So I decided to spend all my GPS points on the first 7 days, using three ‘routes’ per day to pack in maximum detail.
I designed the routes on mapmyride.com, which allows you to download them as GPX files – however these typically use about 300 points per day.
Next, I used gpsbabel’s “simplify” filter to get each day down to 150 points, and another filter to convert the “track” files which mapmyride provide into “route” files. Finally, I needed to split each day into three separate 50-point routes. I briefly entertained the notion of using xslt, before seeing sense and doing it in about two minutes using emacs keyboard macros.
So now I’m tooled up with high-res tech, ready to navigate across the country using relativistically-corrected satellite quad-lateration.
Here is my planned route, with links to maps showing each day’s travels:
d1 (Mon) Lands End to Wadebridge [64miles]
d2 (Tue) Wadebridge to Great Torrington [57miles]
d3 (Wed) Great Torrington to Bridgewater [68miles]
d4 (Thu) Bridgewater to Tintern [72miles]
d5 (Fri) Tintern to Much Wenlock [81miles]
d6 (Sat) Much Wenlock to Leigh [83miles]
d7 (Sun) Leigh to Sedbergh [77miles]
d8 (Mon) Sedbergh to Longtown [62miles]
d9 (Tue) Longtown to Auchinleck [73miles]
d10 (Wed) Auchinleck to Tarbet [63miles]
d11 (Thu) Tarbet to Ft William [73miles]
d12 (Fri) Ft William to Inverness [61miles]
d13 (Sat) Inverness to Brora [56miles]
d14 (Sun) Brora to John o’Groats [63miles]